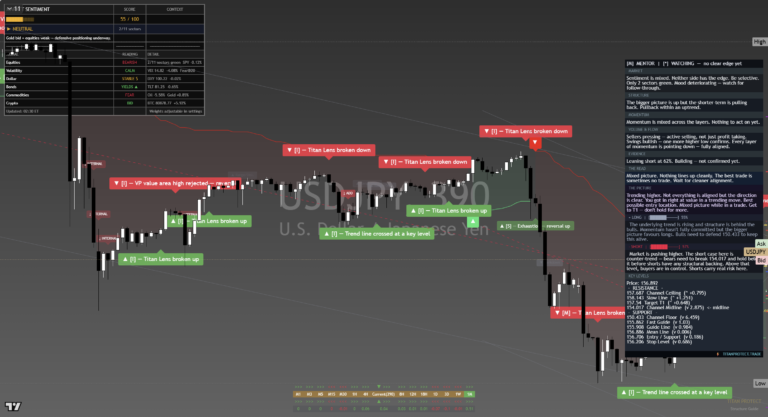
The USDJPY Framework Journal for June 2026, newest read at the top. Each dated entry is our read on the close, kept as a living record so the framework can be judged over time. This is analysis, not financial advice.
Tuesday 30 Jun 2026
Dollar Yen — Daily Framework Read
Tuesday 30 June 2026 • Titan Macro Desk
Saturday’s read was bullish. The framework has strengthened that conviction. Multiple trend line crossings at key levels, value area highs crossed, and the channel is holding firm. Everything that was working on Saturday is working more convincingly now. The structural alignment has deepened, not faded.
The analysis reads strongly bullish. Not everything is aligned but the direction is clear and conviction is high. The trend is strong, the channel is solid, and buyers are stepping in on every dip. The BoJ intervention watch is the only meaningful counterweight.
Framework Interpretation
Structure
Structure is strong. Treat this carefully. Long is the primary read but the pace matters. The channel is solid and there is no reason to fade it. Multiple trend line crossings at key structural levels confirm the upward trajectory. Value area highs have been crossed and the market is building above them. This is a trending market that rewards patience on pullbacks, not counter-trend bets.
Momentum
Momentum is aligned with the structural read. Genuine demand is driving this move, not just speculative positioning. The framework sees buyers stepping in with conviction on every dip, and the internal readings suggest that the move has more to give. This is a market that is pressing higher because it wants to, not because it is being squeezed into it.
Volume Profile
Volume profile confirms the bullish thesis. Value area highs have been decisively crossed. The acceptance above prior value areas is the clearest signal of repricing that the framework offers. The market has moved up and is holding, not visiting and retreating. Each push higher is building on the last one, which is the hallmark of a trending environment.
The Call
The analysis reads strongly bullish for USD/JPY. The trend is clear, the structure is aligned, and momentum supports continuation. The caveat is always BoJ intervention risk, which rises as the pair extends. Do not ignore that tail risk, but do not let it prevent you from following what the framework is telling you. Pullbacks into the 144.00-144.50 zone are the preferred entry area. Chasing above 145.50 is poor process even in a trending market.
Key Levels
Risk Assessment
The structural read is clean and the direction is unambiguous. Risk is low from a framework perspective. The 28% factor reflects the ever-present BoJ intervention risk and the fact that extended trends become more vulnerable to sharp reversals. The analysis reads bullish, but the pace of the advance matters for position management.
Scenario Analysis
50%
Continuation above 145.80, targeting 146.50. Dollar strength and yield differential drive the move.
25%
Consolidation between 144.50-145.80. Market pauses to digest gains before the next push.
15%
Pullback through 144.50 toward 143.80. Would require a shift in risk sentiment or BoJ verbal intervention.
10%
BoJ direct intervention. Higher than typical black swan probability given current levels. Would snap the pair 300-500 pips lower in minutes.
Position Sizing Guidance
STANDARD
REDUCED
AVOID
Standard sizing despite the high conviction. The elevated BoJ intervention probability prevents maximum allocation. The framework is clear but the tail risk is real and asymmetric. One intervention event can wipe out months of trend-following gains. Standard size with tight trailing stops is the disciplined approach.
Experience-Level Guidance
For Developing Traders
This is what a strong trending environment looks like. The framework is aligned, the direction is clear, and the structure is building. But trending markets also carry the risk of sharp reversals, especially in USD/JPY where central bank intervention is a factor. If you are new to this pair, understand that it can move 300+ pips in a single session on BoJ action. Size accordingly. Pullbacks to 144.50 are the entry area, not the current level.
For Intermediate Traders
The trend is your friend until it ends, and in USD/JPY, the ending can be violent. The framework supports continuation but position management is critical. Trail stops progressively and take partial profits at resistance levels. The 145.80 upper channel boundary is the next area to reduce exposure. Do not let a winning position become a losing one because of greed.
For Advanced Traders
The yield differential and dollar strength are the fundamental anchors. The framework’s structural read confirms what the macro picture is telling us. The BoJ intervention risk is elevated but not imminent based on recent verbal signals. Watch for changes in BoJ rhetoric as the leading indicator. If verbal intervention intensifies, reduce exposure before the actual intervention arrives. The smart money is positioned for continuation but has defined exits, not open-ended exposure.
This content is for informational and educational purposes only. It does not constitute financial advice, a recommendation, or an offer to buy or sell any financial instrument. Trading foreign exchange carries a high level of risk and may not be suitable for all investors. Past performance is not indicative of future results. You should consider your financial situation, investment objectives, and risk tolerance before making any trading decisions. Always conduct your own research. Titan Protect and its contributors accept no liability for losses arising from the use of this material.
Tuesday 30 Jun 2026
Dollar Yen — Daily Framework Read
Monday 29 June 2026 • Q3 Day 1 • Daily Read
LONG
• Launch Edition
LONG
• Conf: HIGH • Risk: 4.5
Bias confirmed. Strong structural uptrend. Intervention risk is primary concern.
The analysis reads USD/JPY as structurally bullish with high confidence. The framework panel shows buyers loading risk with genuine demand, not just short covering. Price at 161.92 is at multi-decade highs and the structure is parabolic. The bigger picture is building, not fading. However, the elevated risk factor reflects intervention risk from the BOJ, which remains the single largest threat to this setup.
Framework Interpretation
Structure
Structure is emphatically bullish. The chart shows a staircase of higher highs and higher lows with value area lows being crossed and held as support on retests. The Titan Lens confirmations are all firing upward. Multiple trend line crosses at key levels confirm the directional bias. This is the cleanest structural read in the FX basket today. The market is not debating direction, it is debating pace.
Momentum
Momentum is charging in with genuine demand, not just short covering. Buyers are actively adding exposure, not just defending positions. Every layer of momentum is pointing higher and the analysis reads this as a trending environment where dips are buying opportunities, not warning signs. The force behind this move is yield differential driven and that fundamental anchor is not changing anytime soon.
Volume Profile
Volume profile shows acceptance at elevated levels. Value area highs have been crossed repeatedly and each prior resistance has become support. The profile reads as a market that is repricing higher with each session, building new value zones above the last. The trend line crossings at key structural levels add weight. There is no distribution pattern in the volume profile, which tells us this is not a blow-off top in structural terms.
The Call
The analysis reads USD/JPY as structurally higher with high confidence. The contradiction here is that the dollar is weak on DXY but strong against the yen. That is because the yen weakness is driven by the BOJ policy divergence, not dollar strength. This pair is trading on its own fundamentals, not the broad dollar narrative. Pullbacks into the 161.00-161.40 zone are the framework’s preferred entry. The risk that cannot be modelled is BOJ intervention, which becomes more likely the further price extends above 160. Risk must be defined and respected.
Key Levels
Risk Assessment
The structural read is the strongest in the FX basket but the risk factor is elevated because of the BOJ. At 161.92, the pair is in the zone where Japanese authorities have previously intervened. An intervention event would create a 300-500 pip dislocation in minutes, which no stop-loss can reliably protect against. The framework rates the structure as high-conviction bullish but the tail risk as non-trivial. Position sizing must account for the intervention scenario.
Scenario Analysis
45%
Yield differential continues to drive yen weakness. Price extends toward 162.50-163.00. BOJ verbal intervention only, no action. Q3 carry trade reallocation supports.
25%
Consolidation between 161.00-162.50. Market respects the intervention threat and slows the pace of advance.
15%
Risk-off event or hawkish BOJ shift pulls price back to 160.20. Structural support should hold absent intervention.
15%
Actual BOJ intervention drives a 300-500 pip dislocation toward 158.50 or lower. Non-trivial probability at these levels. Size accordingly.
Position Sizing Guidance
STANDARD
REDUCED
AVOID
Despite high structural confidence, the framework recommends reduced sizing because of intervention tail risk. The structure says long but the risk profile says smaller. If the BOJ intervenes, a standard-sized position could generate outsized losses that would take weeks to recover. Reduced sizing with wide stops below 160.20 respects both the structural bullish read and the intervention reality.
Experience-Level Guidance
For Developing Traders
This chart is a textbook example of a structural uptrend, but it comes with a real-world lesson. Even the cleanest chart setup can be destroyed by central bank intervention. The BOJ has a history of stepping in at these levels and no technical framework can predict when they will act. This is why position sizing matters more than being right about direction. Study the chart for the structural read, but understand that this is not a beginner-friendly trade because of the intervention risk.
For Intermediate Traders
The yield differential is the fundamental anchor. As long as the BOJ maintains its dovish stance relative to the Fed, the carry trade supports yen weakness. The framework’s pullback zone at 161.00-161.40 is where the structure says buyers should emerge. Use reduced sizing and accept that an intervention event is a cost of doing business in this pair. The Q3 quarter turn is typically positive for carry trades as real money reallocates.
For Advanced Traders
The contradiction between DXY weakness and USD/JPY strength is the key insight. This pair is trading on its own fundamentals, divorced from the broad dollar narrative. The implied volatility term structure around intervention levels often provides clues about when the market expects BOJ action. Watch for a spike in 1-week USD/JPY vol relative to 1-month. If the short-term vol premium expands rapidly, the market is pricing intervention risk higher. Consider options structures that define risk better than spot in this environment.
This content is for informational and educational purposes only. It does not constitute financial advice, a recommendation, or an offer to buy or sell any financial instrument. Trading foreign exchange carries a high level of risk and may not be suitable for all investors. Past performance is not indicative of future results. You should consider your financial situation, investment objectives, and risk tolerance before making any trading decisions. Always conduct your own research. Titan Protect and its contributors accept no liability for losses arising from the use of this material.
Sunday 28 Jun 2026
Dollar Yen — Daily Framework Read
Sunday 28 June 2026 • Weekend Edition • Launch Read
This is the launch edition of our daily framework reads. No prior-day comparison is available. All readings reflect the current structural snapshot as of Friday’s close.
Framework Interpretation
Structure
Dollar Yen is in a working uptrend and the structure is clean. The bigger picture is bullish with price above all four trending averages. Multiple trend line crosses at key levels confirm the directional bias. The framework sees this as a market where the structure is doing exactly what you want to see in a trending environment. Higher highs, higher lows, and acceptance above prior value areas.
Momentum
Momentum is aligned and building. This is not a tired trend. The analysis reads upside demand that is genuine, not just carry-trade driven. The internal readings show full alignment across the momentum layers, which is the kind of convergence that typically precedes continuation rather than exhaustion. Everything is pointed against short sellers at this stage.
Volume Profile
Value area highs have been crossed and accepted. The volume profile confirms that the market is building value higher with each session. There is no rejection at these levels. The structure tells us that institutions are comfortable with price at this range, which is the hallmark of a trending market rather than an overextension.
The Call
The analysis reads this as a strong long environment. Everything is aligned: structure, momentum, and volume profile all point higher. The risk for shorts is significant at these levels. Pullbacks into the 143.50-143.80 zone would represent buying opportunities. The underlying trend is rising and short-term momentum is locked in. This is one of the cleaner reads across the FX board this weekend.
Key Levels
Risk Assessment
The 38% risk factor reflects BOJ verbal and actual intervention risk at elevated yen levels, combined with weekend gap exposure. The structural read is clean and would warrant lower risk in normal conditions, but Dollar Yen carries unique central bank tail risk that must be priced in. The trend itself is not the risk. The policy response to the trend is.
Scenario Analysis
50%
Continuation toward 145.50. Carry trade flows and US yield differential maintain upward pressure.
25%
Consolidation between 143.80-144.80 as market awaits next macro catalyst.
15%
Pullback to 143.20 on profit-taking or BOJ verbal jawboning. Would not break the structural uptrend.
10%
BOJ actual intervention. Weekend announcement of emergency measures. Higher probability than other pairs due to policy sensitivity.
Position Sizing Guidance
STANDARD
REDUCED
AVOID
Standard sizing despite the high structural confidence. The BOJ intervention tail risk is the reason this is not a maximum allocation call. The trend is clean and the direction is clear, but yen pairs carry unique policy risk that requires smaller sizing relative to the conviction level. Risk defined below 142.50.
Experience-Level Guidance
For Developing Traders
This is one of the cleanest structural reads across the FX board right now. Everything points higher. But there is a lesson here: clean structure does not mean zero risk. Dollar Yen carries BOJ intervention risk that can move price 300-500 pips in minutes. The framework teaches you to size for the tail, not the trend. Use smaller positions and wider stops than you think you need.
For Intermediate Traders
The full alignment across structure, momentum, and volume is compelling. Pullbacks into 143.50-143.80 are the entry the framework supports. Keep position sizes moderate because of intervention risk. Consider hedging with options if your account allows it. The carry trade tailwind is real but the policy headwind is the counterbalance. Monitor BOJ rhetoric closely through the week.
For Advanced Traders
The framework convergence here is as strong as it gets. The question is not direction but sizing and tail management. Consider a scaled entry with a portion at Sunday’s open and additions on any dip to 143.50-143.80. The invalidation at 142.50 is the structural break level. Note that the 10% black swan probability is materially higher than other G7 pairs, reflecting the BOJ factor. Cross-reference with the DXY read for broader dollar context.
This content is for informational and educational purposes only. It does not constitute financial advice, a recommendation, or an offer to buy or sell any financial instrument. Trading foreign exchange carries a high level of risk and may not be suitable for all investors. Past performance is not indicative of future results. You should consider your financial situation, investment objectives, and risk tolerance before making any trading decisions. Always conduct your own research. Titan Protect and its contributors accept no liability for losses arising from the use of this material.
Thursday 25 Jun 2026
Titan FX Desk · Daily Framework Read · Thursday 25 June 2026
USD/JPY: Long Signal at 56% as Yen Weakness Drives Through Value Area and Trend Lines
Confidence: Around 56%
11 Conditions
Yesterday vs Today
| Signal | Long (Wednesday) | LONG (Thursday) |
| Shift | Long signal maintained and strengthened. The chart shows a powerful uptrend with value area lows being reclaimed, trend lines crossed at key levels to the upside, and Fibonacci retracement levels acting as springboards. The yen weakened despite the Nikkei bounce, suggesting carry trade flows and rate differential dynamics are the driver rather than risk sentiment alone. Builds need to defend 151.5M to keep the uptrend intact. | |
Daily Read
USD/JPY continues its long signal with 11 conditions matched at 56% confidence. The chart is one of the cleaner reads in today’s universe. The uptrend is well-defined with a series of higher lows, value area reclaims, and trend line breaks to the upside. Multiple Fibonacci retracement levels have been tested as support and held.
The interesting dynamic is that USD/JPY is rising despite DXY weakness. This means the yen side is doing all the work. Yen weakness is being driven by the Bank of Japan’s ultra-loose policy stance relative to the Fed, carry trade inflows, and the unwinding of yen hedges that were built during Wednesday’s Nikkei rout. When the Nikkei bounced 4.61%, the defensive yen positions were no longer needed.
The framework shows trend lines crossed at multiple key levels on the way up, with each one acting as a new support floor. Value area highs are being reclaimed and held. The momentum is fully aligned across the layers. This is one of the highest-conviction reads in today’s universe, though the BOJ intervention risk at elevated levels remains a constant shadow.
The risk to this trade is a BOJ verbal or actual intervention, which tends to happen without warning and creates instant 200-300 pip reversals. The framework cannot price this event risk, so the technical read remains long but position sizing should account for the tail risk of intervention.
Key Levels
| Level | Price | Significance |
|---|---|---|
| Resistance 2 | 155.00 | Intervention risk zone, BOJ sensitivity |
| Resistance 1 | 153.50 | Trend line cross, near-term target |
| Current Zone | 152.00 – 153.00 | Active long zone, momentum aligned |
| Support 1 | 151.00 | Value area low, first support |
| Support 2 | 149.50 | Major demand zone, trend invalidation |
Risk Assessment
Around 60%
Moderate-to-elevated. The technical picture is clean and constructive but BOJ intervention risk is an ever-present tail event. DXY weakness is a headwind but yen-specific factors are dominating. Position sizing should account for the asymmetric downside of an intervention event.
What to Watch Today
- BOJ commentary or verbal intervention signals near 155.00
- Nikkei correlation: does the yen continue weakening with a stable Nikkei?
- US-Japan rate differential: Treasury yields versus JGB yields
- Carry trade flow intensity via options market positioning
This daily read is produced by the Titan FX Desk for educational and informational purposes only. It does not constitute financial advice or a recommendation to buy or sell any instrument. All levels and scenarios are analytical reference points, not trading instructions. Past performance of any level or scenario is not indicative of future results. Always apply your own risk management. Capital is at risk.
Wednesday 24 Jun 2026
Titan FX Desk · Daily Framework Read · Wednesday 24 June 2026
USD/JPY: Carry Trade Intact as Yen Refuses to Rally Despite Risk-Off
Yesterday vs Today
Monday 23 June: USD/JPY was trading near 143.2, and the Nikkei was down 3.0%. Normally, that kind of equity selloff would see the yen rally as a safe haven, pulling USD/JPY lower. Instead, the pair held firm, which was a strong signal that the carry trade was dominating safe-haven demand.
Wednesday 24 June: The carry dominance has continued and even intensified. USD/JPY has pushed higher to 143.40, gaining 0.11% despite ongoing risk-off conditions. The framework shows trend lines crossing upward, value areas being broken to the upside, and bullish structure building. The yen is losing on every front: dollar strength and carry appetite are both working against it.
Daily Read
USD/JPY at 143.40 is sending one of the clearest signals in the FX market today: the carry trade is alive, well, and overwhelming the yen’s traditional safe-haven bid. In a session where equities are falling, the VIX is elevated, and commodity currencies are getting hammered, you would expect the yen to attract flows. It is not.
The reason is structural: the rate differential between the US and Japan remains enormous. With the Fed holding rates and the Bank of Japan still running one of the loosest monetary policies among developed economies, the carry return on being long USD/JPY is too attractive for institutional money to walk away from, even during a risk-off episode. The market is telling you that this selloff is not severe enough to break the carry trade.
The framework is trending higher. Trend lines have crossed upward at key levels, the value area is being broken to the upside, and momentum is stacking. This is a grinding bullish move rather than a spike, which tends to be more sustainable. The bounces from demand are occurring at progressively higher levels, which is textbook trending behaviour.
The risk to the bullish thesis is intervention. Japanese authorities have historically intervened when USD/JPY moves become disorderly, and the 145 level has been flagged by multiple market participants as a zone where verbal jawboning, at minimum, becomes likely. At 143.40, we are approaching that sensitivity zone but have not reached it yet.
The other risk is a genuine panic event in equities that overwhelms carry flows. If VIX spikes above 25 and the Nikkei moves into a genuine crash dynamic, the yen will rally regardless of carry differentials as institutions are forced to unwind positions to meet margin calls. We are not in that territory today, but it is worth monitoring.
Key Levels
| Level | Price | Significance |
|---|---|---|
| Resistance 2 | 145.00 | Intervention sensitivity zone, major psychological level |
| Resistance 1 | 144.00 | Near-term overhead, round number resistance |
| Current Price | 143.40 | Trending higher, carry-dominant positioning |
| Support 1 | 142.80 | Value area low, first buyer zone on dips |
| Support 2 | 142.00 | Prior consolidation zone, structural floor |
| Major Support | 141.00 | Deep support, would require yen safe-haven bid to reach |
Risk Assessment
Around 50%
Moderate risk. The trend is bullish and the carry narrative supports it, but approaching the 145 intervention zone creates asymmetric downside risk. The carry trade can unwind rapidly if risk-off conditions intensify. Japanese authorities are watching. The primary risk is a sudden yen rally on intervention rhetoric or an equity panic event that forces carry unwinds.
Scenario Analysis
Carry flows continue to dominate. USD/JPY pushes toward 144 on continued dollar strength and yield differential support. Risk-off conditions moderate, removing the primary threat to the trade. The pair grinds higher through the week as institutional positioning builds.
Equity selloff intensifies and VIX breaks above 22. Japanese officials make verbal intervention comments near 144. Carry trades start to unwind. USD/JPY reverses sharply toward 142 as safe-haven yen demand overwhelms carry appetite. The reversal would be fast and violent, as carry unwinds tend to be.
USD/JPY grinds in the 143 to 144 range. Carry flows support on dips while the approach toward intervention territory caps the upside. The pair continues its mild bullish drift but the pace slows as the market becomes more cautious about the 145 level.
This daily read is produced by the Titan FX Desk for educational and informational purposes only. It does not constitute financial advice or a recommendation to buy or sell any instrument. Capital is at risk.
Tuesday 23 Jun 2026
Titan Macro Desk · Daily Framework Read · 23 June 2026
USD/JPY: 161.55 Keeps Japan in the Intervention Danger Zone
Framework Read
USD/JPY at 161.55 is the most politically sensitive FX pair in the world right now. Japan’s Ministry of Finance has intervened to support the yen at these levels in the past, and every major currency strategist on the planet has 160 to 165 marked as the zone where they expect authorities to act. At 161.55, we are sitting in the middle of that band.
The Nikkei falling 3.0% today creates an interesting dynamic. Normally a weaker yen is good for Japanese equities because it boosts the yen-equivalent earnings of export companies like Toyota, Sony, and the major electronics firms. But the Nikkei is falling sharply despite the yen being weak. That tells you the equity selloff is being driven by global factors — specifically the risk-off contagion from Monday’s US sell-off — that are overriding the currency tailwind. It is a situation where the yen’s weakness is not working as the usual shock absorber for Japanese stocks.
The intervention question is the one that matters. Japan has previously intervened by buying yen directly (selling dollars), and they have also used verbal guidance — statements from senior MOF or BOJ officials expressing concern about “rapid and one-sided” currency moves. At 161.55, the risk of at least a verbal warning is high. An actual intervention is less certain because the dollar has not been moving aggressively against the yen; the pair has been in a slow drift rather than a sudden spike. Authorities typically react more sharply to velocity of move than to level alone.
The Bank of Japan’s rate posture is the underlying driver. With Japanese short-term rates still at historically low levels and US rates significantly higher, the carry trade in USD/JPY remains deeply attractive. Traders borrow yen cheaply and park the proceeds in dollar-denominated assets. Unwinding that trade would require either a significant BOJ rate hike or a sharp drop in US yields — neither of which is imminent today.
If US earnings tonight spark a risk-off deterioration globally, you could see a classic yen safe-haven move where USD/JPY pulls back sharply. In risk-off episodes, the carry trade tends to unwind and the yen strengthens. That would be a sudden and violent move given how crowded the long-dollar-yen positioning currently is.
Key Levels
| Level | Price | Significance |
|---|---|---|
| Resistance 1 | 162.00 | Round number above, authorities highly alert here |
| Intervention Risk Zone | 162.50 – 165.00 | Zone where prior interventions have been triggered; high alert |
| Current Price | 161.55 | Inside intervention danger zone, no directional resolution yet |
| Support 1 | 160.00 | Round number floor, prior intervention target level |
| Support 2 | 158.00 | Larger support zone, would require significant risk-off yen buying |
| Safe-Haven Snap Risk | 155.00 | Destination in a full risk-off carry-trade unwind scenario |
Risk Assessment
Around 65%
Elevated risk from two directions. First, authorities could intervene and trigger a sharp yen rally. Second, if global risk-off escalates, the carry trade unwinds and the yen strengthens rapidly and without warning. Both paths represent significant volatility risk for anyone positioned long USD/JPY. The current level is not a comfortable holding position.
Scenario Analysis
US earnings are positive. Risk appetite stabilises. The carry trade holds and USD/JPY drifts toward 162.50. No intervention. BOJ holds rates steady and the rate differential maintains the structural bias for yen weakness. Dollar bulls maintain their position through the week.
US earnings disappoint and equities fall further. Risk-off triggers a carry trade unwind. USD/JPY drops rapidly from 161.55 to 158.00 as yen safe-haven buying overwhelms the dollar. MOF officials issue intervention warnings at 162 before the unwind starts, which accelerates the move. Stop cascades below 160.00 are significant.
USD/JPY stays in a 160.80 to 162.20 range. No intervention today but verbal guidance risk remains elevated. The pair drifts sideways through the London and New York sessions, waiting for the US earnings outcome to determine whether risk appetite recovers or deteriorates further. The carry trade is uncomfortable but intact.
This framework read is produced by the Titan Macro Desk for educational and informational purposes only. It does not constitute financial advice or a recommendation to buy or sell any instrument. Capital is at risk.
Monday 22 Jun 2026
US Dollar / Japanese Yen (USD/JPY)
Daily Read — Monday 22 June 2026
Current Price
161.56
Daily Change
-0.13%
Thursday Close
161.76
Session Tone
Intervention Watch
Risk Score
Around 72%
Bias
Bullish But Dangerous
Week Range
160.80 – 162.50
Intervention Risk Active
USD/JPY at 161.56 is in the zone where the Japanese Ministry of Finance has intervened previously. The 160-165 band carries active verbal intervention risk. Position sizes must account for the possibility of a sudden 300-500 pip reversal on official action. This is not a normal risk management environment for this pair.
London Open: 08:00 BST
Tokyo Open: 09:00 JST
What Happened
USD/JPY is trading at 161.56 on Monday, down 0.13 percent from Thursday’s 161.76. The modest pullback does nothing to change the structural picture: the pair remains in deeply elevated territory, held up by the widest rate differential in the G10. The Bank of Japan is maintaining ultra-loose policy while the Fed, reinforced by Warsh’s hawkish commentary on Friday, is signalling rates stay higher for longer.
The slight Monday dip from 161.76 to 161.56 is likely profit-taking from week-end USD longs rather than any fundamental shift. Japanese officials have been increasingly vocal about yen weakness at these levels, and the memory of the 2022 and 2023 interventions is fresh for anyone who has traded this pair. The Ministry of Finance intervened at levels around 151-152 and again above 160 in prior cycles. At 161.56, the pair is well inside the historical intervention zone.
The structural driver remains unchanged. As long as US 10-year yields stay above 4.2 percent and Japanese government bond yields are capped by BOJ policy, the carry trade argument for holding USD/JPY long is mathematically intact. The risk is the tail: intervention, a surprise BOJ hike, or a sudden shift in US yields can produce losses that wipe out months of carry income in a single session.
Macro Context: Carry Trade vs Intervention Risk
USD/JPY at 161 is a pair where the macro fundamentals and the tail risks point in completely opposite directions. Understanding both is the requirement before taking any position.
The carry argument. The US-Japan rate differential is among the widest in decades. US short rates at current levels versus Japanese short rates near zero creates a mathematical incentive to borrow yen and hold dollars. That carry income accrues daily to long USD/JPY positions. As long as the BOJ remains committed to its yield curve control framework and the Fed stays hawkish, the carry trade is structurally funded. Warsh’s Friday comments directly extended the life of this trade by removing near-term Fed cut expectations.
The intervention risk. Japan’s Ministry of Finance has a stated mandate to prevent disorderly yen moves. At 161, the yen has lost roughly 30 percent of its value from the 115 levels seen in early 2022. Japanese politicians are under domestic pressure to act. The mechanism for intervention is direct dollar selling in the market, and when it happens it is fast and sharp. There is no warning. The prior intervention rounds saw 300-600 pip reversals within hours. Anyone holding an oversized long position at 161 who is not accounting for this tail is taking on unpriced risk.
BOJ policy watch. The Bank of Japan’s next policy meeting is the most important near-term catalyst. Any hint of an earlier-than-expected rate hike, or a move to widen the yield curve control band, triggers immediate yen strengthening. The BOJ has surprised markets before on this. Positioning for a BOJ pivot is a valid structural trade for the back half of 2026. USD/JPY at 161 provides an attractive entry for anyone willing to hold a small short for three to six months with a wide stop above 163.
Key Levels
| Level | Price | Significance |
|---|---|---|
| Resistance 2 | 162.00 | Round number ceiling, heightened intervention talk above here |
| Resistance 1 | 161.76 | Thursday close, now near-term ceiling |
| Pivot | 161.56 | Current level, Monday range |
| Support 1 | 160.80 | Intraday demand, hold keeps carry long intact |
| Support 2 | 159.50 | Weekly structure, loss signals yen recovery building |
| Intervention Target | 157.00 | Likely MOF target if intervention occurs from 162+ |
Strategy Tiers
| Tier | Direction | Entry | Stop | Target | R:R |
|---|---|---|---|---|---|
| Scalp | Cautious Long | Dips to 160.80–161.00 | 160.50 | 161.76 / 162.00 | 1:2.5 |
| Intraday | No Trade | Intervention risk makes intraday long entries unacceptably risky above 161.50 | |||
| Swing | Structural Short | 162.00–162.50 on a push higher | 163.20 | 159.50 / 157.00 | 1:2.8 |
| Positional | Short USD/JPY | Build on BOJ pivot signals | 163.50 | 155.00 | 1:3.2 |
Scenario Analysis
| Scenario | Probability | Trigger | Target |
|---|---|---|---|
| Bull (USD) | 35% | US yields stay elevated, no BOJ surprise, pair grinds to 162+ | 162.50 |
| Sideways | 30% | Range holds 160.80–162.00 as both sides wait for catalysts | Range trade |
| Intervention | 20% | MOF acts as pair tests 162, verbal then physical intervention | 157.00 |
| Black Swan | 15% | Surprise BOJ rate hike or US yield spike above 5% | 154 or 165 |
Position Sizing
Intraday Long
AVOID
Intervention kills it instantly
Swing Short
REDUCED
25% size, wide stop
Scalp Dip Buy
STANDARD
Small, defined risk, tight stop
Bull Case (USD)
Warsh-driven Fed hawkishness keeps US 10-year yields above 4.5 percent. BOJ stays on hold through summer. USD/JPY grinds from 161.56 toward 162.50 as carry traders add on dips. Intervention risk is managed by the MOF staying verbal only this week without pulling the physical trigger.
Bear Case (USD)
The Japanese Ministry of Finance steps into the market with unannounced dollar selling as the pair approaches 162. A fast 300–400 pip reversal to 158–159 catches long carry traders completely offside. This is the scenario that separates disciplined traders from those carrying oversized exposure. Alternatively a BOJ pivot signal sends USD/JPY toward 157 over several sessions.
Experience Level Guidance
Beginner
USD/JPY at 161 is not a pair to trade casually. The intervention risk means that a position can lose 300 pips in seconds with no warning and no technical signal. If you are building your experience with FX, use this pair only to study how a carry trade works in theory. Read about the 2022 and 2023 Bank of Japan interventions and look at what the charts looked like before and after. That pattern recognition is more valuable than any current trade setup at these levels.
Intermediate
If you want to participate in USD/JPY this week, the only defensible approach is a small scalp long on dips to 160.80–161.00 with a hard stop at 160.50. Your target is 161.76 where the prior Thursday close creates natural resistance. Take profit before the pair approaches 162 because that is where intervention risk escalates sharply. Do not hold the position overnight. The overnight carry does not compensate for the fat tail of a 3 AM Tokyo intervention. Size is key here: 25 percent of your normal position, hard stop, no arguing with the exit.
Advanced
The structural trade for the second half of 2026 is short USD/JPY. The BOJ is moving toward policy normalisation. The timing is uncertain but the direction is not. A small position short from 162–163 with a stop above 165 and a target at 155 over three to six months is the high-conviction structural call. The Warsh hawkishness delays but does not eliminate the eventual USD/JPY reversal. The carry trade unwind when it comes tends to be violent and fast, similar to August 2024. Building a short position gradually on strength, with a wide stop, allows you to stay in the trade through the noise while being positioned for the eventual shift in BOJ policy.
What to Watch This Week
- Japanese Ministry of Finance statements — verbal warnings escalate before physical intervention
- BOJ speaker comments — any hint of yield curve control adjustment triggers immediate yen strength
- US 10-year Treasury yield — if it breaks above 4.6%, USD/JPY sees fresh buying; below 4.2%, carry trade pressure builds
- 162.00 round number level — this is the psychological trigger for MOF action
- Risk sentiment broadly — USD/JPY and risk appetite are inversely correlated; equity selloff = yen bid
- Japan trade balance data if released — a wider deficit adds fundamental pressure on yen
Risk Assessment
Elevated. Around 72% risk environment. USD/JPY at 161 carries the highest tail risk of any major FX pair this week. The fundamentals support USD long, but the intervention risk at 162 creates a scenario where the trade is correct for 90 percent of the time and catastrophically wrong for 10 percent of the time. That asymmetry demands small position sizing regardless of directional conviction. Keep size at 25 percent of normal or lower. The risk score of 72 percent reflects the fat left tail, not a genuine probability that the pair falls. The base case is range trade, but the consequences of the downside scenario are severe enough to price it heavily.
Titan Macro Desk — FX Coverage
This content is for informational purposes only and does not constitute financial advice. Past performance is not indicative of future results. Trading involves risk of loss. Always conduct your own research before making any investment decisions.
Thursday 18 Jun 2026
USD/JPY — Daily Framework Read | Thursday 18 June 2026
Titan Macro Desk | Daily Framework Read
USD/JPY closed Thursday at 161.76, up 0.84 percent. Yesterday it closed at 160.77, up 0.34 percent. Two consecutive sessions of yen weakness in an accelerating trend. The framework is long. The intervention risk is building. At 161, Tokyo is watching. At 162, they are reaching for the phone.
Where It Sits
USD/JPY is the most politically sensitive major FX pair in the world. At levels above 160, the Japanese Ministry of Finance has historically intervened to cap yen weakness. The pair is now at 161.76 and trending higher. The structural backdrop supports further upside on pure market dynamics. But the intervention threat is a binary risk that does not appear on any chart.
The yen has weakened because of one simple driver: the Bank of Japan has been the only major central bank to resist raising rates aggressively. While the Fed held at restrictive levels and the BOE signalled cuts coming, the BOJ remained anchored near zero. That rate differential made the yen a funding currency for global carry trades — borrow in yen, invest in higher-yielding assets elsewhere. Every day the Fed stays on hold, that carry trade gets more attractive, and USD/JPY goes higher.
Thursday’s chart shows the framework reading long, with upside breakouts from value area levels and trend line confirmations in the direction of the move. There is no structural resistance immediately above 161.76 on the chart. The next meaningful technical zone is 162.00 to 162.50. The the framework panel on the screenshot flagged the move as a continuation, not a new buy signal — meaning the momentum has been building for multiple sessions and Thursday was an extension of an established trend.
The framework is long. The risk is intervention, not technicals. Those are two different conversations and they require two different responses.
Yesterday vs Today: Yen Weakness Accelerating
Wednesday 17 June: USD/JPY closed at 160.77, up 0.34 percent. The FOMC hawkish hold added a marginal dollar bid but the pair was already trending. The 160 level had been taken and held earlier in the week. Wednesday’s session saw a grind higher rather than a decisive push. The framework was already reading long on Wednesday, with the structural trend intact and no signs of reversal. The screenshot from Wednesday showed the pair in the upper part of its established range, with value area levels already breached to the upside on shorter timeframes.
Thursday 18 June: The pair extended to 161.76, adding 99 pips on the session. The broader dollar strength from the DXY moving to 100.84 provided the catalyst. The move was cleaner and faster than Wednesday’s session. Thursday’s chart shows the framework fully aligned upside with multiple confirmation signals appearing simultaneously. Value areas broke above, trend line crossings registered in the direction of the move, and no reversal signals were visible at the close.
Combined two-day move: approximately 130 pips higher from Wednesday’s open near 160.40 to Thursday’s close at 161.76. That pace of yen weakening is beginning to attract attention in Tokyo.
| Session | Close | Move | Driver |
|---|---|---|---|
| Wednesday 17 Jun | 160.77 | +0.34% (yen weaker) | FOMC hawkish hold, carry bid |
| Thursday 18 Jun | 161.76 | +0.84% (yen weaker) | Dollar strength accelerates, carry extends |
| Two-day pace | +1.18% | Yen weakness building | Intervention risk window opening |
Key Levels
Support: 160.00 to 160.50. The prior breakout zone that the pair cleared and held. A pullback to this area would be a technically valid continuation buy in the context of the uptrend. This level is where genuine buyers defend the long thesis. A daily close back below 160.00 would be the first signal that the momentum has stalled and would push toward 158.50 as the next structural level.
Current zone: 161.00 to 162.00. The pair is trading in this band following Thursday’s close at 161.76. This is no-man’s land from a technical standpoint — above the prior breakout, below the upper intervention risk zone. The probability of directional volatility is highest here because both bulls and intervention risk sit within a tight range.
Intervention risk zone: 162.00 to 162.50 and above. Historical context shows the MOF intervened aggressively at levels above 160 in 2022 and has done so again subsequently. At 162 the pair enters territory where intervention becomes likely rather than possible. A sharp yen recovery of 200 to 400 pips in a single session is what intervention looks like when it lands. It is a tail risk that cannot be ignored when trading long positions above 161.
Deeper resistance: 163.00 to 165.00. If no intervention materialises and the carry trade dynamic continues, the measured move targets from the current breakout point toward this zone over the next two to four weeks. This would be the zone where intervention becomes near-certain rather than probable.
Long Bias Setup
Continuation Long: Buy Pullback Into 160.00 to 160.50
Risk score: around 62%. Structurally sound trade that aligns with the framework. Intervention risk is the primary wildcard.
Entry: 160.00 to 160.50 on a controlled pullback with a confirmation candle showing demand. Stop: 159.30 (below the structural support floor and below the level where the uptrend becomes invalidated on the daily chart). Target one: 162.00. Target two: 163.00. Risk to reward: roughly 1:2.1 to first target, 1:3.7 to second target.
Why it works: The carry trade dynamic is intact. The Fed holds, the BOJ holds lower. The interest rate differential has not changed. Pullbacks to structural support in an established trend are the highest-probability entries available. Kill condition: Daily close below 159.30. That breaks the trend and suggests either intervention or a genuine reversal in the dollar narrative.
Short Bias Setup
Intervention Fade Short: If Price Spikes Into 162.50 to 163.00
Risk score: around 78%. This trade only triggers on a specific spike. Do not anticipate it. Wait for the spike then trade the fade.
Entry: 162.50 to 163.00 only if the pair spikes into this zone without confirmed MOF intervention. A wick rejection from this area, or alternatively the initial reaction to confirmed intervention, is the entry signal. Stop: 163.50 (above the spike zone, accounting for the volatility that accompanies moves at this level). Target one: 161.00. Target two: 160.00. Risk to reward: roughly 1:2 to first target, 1:4 to second target.
Why it works: When the MOF intervenes at these levels the initial yen strengthening move is sharp and violent. If they do not intervene but the pair spikes, the wick rejection from the historically sensitive zone is a high-probability short on its own. Both scenarios deliver the same trade direction. Kill condition: Close above 163.50 with no intervention. That signals the market is ignoring intervention risk and the long bias resumes.
Time Horizons
Intraday (zero to one day): Friday is OpEx. The pair sits at 161.76 and the Asian session will be the first test of whether Tokyo sends a signal. Japanese officials regularly make verbal warnings before physical intervention. Any comment from Deputy Finance Minister Kanda or Finance Minister Suzuki about “excessive volatility” or “monitoring FX moves closely” is the pre-intervention signal. Watch the Asian session open very carefully. If Asia is quiet, the New York session inherits the momentum and 162.00 comes into view.
Swing (two to ten days): Without intervention, the path of least resistance is 162.00 to 163.00 over the next five to ten sessions. The carry trade has momentum and the macro drivers are not reversing. Any BOJ communication that hints at rate hikes changes the picture immediately — a surprise BOJ hike would be the single most powerful yen-strengthening catalyst available. That is not the base case but it is the tail risk for long positions.
Positional (two to eight weeks): The structural uptrend in USD/JPY is intact. A monthly close above 162.00 without intervention would open 165.00 as a multi-week target. The positional trade is long, but sized defensively because the intervention risk is real and the MOF has demonstrated willingness to deploy it. A monthly close below 158.00 would end the trend.
Risk Score
USD/JPY risk score: around 72 percent.
- Plus 30 percent for intervention risk. This is the dominant risk on this pair at these levels. It is binary, unpredictable, and can move the pair 200 to 500 pips in minutes. No technical level protects you from it.
- Plus 20 percent for OpEx Friday in Asian hours. The combination of OpEx liquidity effects and proximity to the intervention threshold creates extreme short-term volatility potential.
- Plus 15 percent for the pace of the move: 130 pips in two sessions is fast for USD/JPY and the pace increases MOF concern.
- Plus 7 percent for weekend gap risk — if news breaks over the weekend about BOJ policy or US economic data, Monday’s open could gap significantly in either direction.
- Minus 10 percent because the structural read is unambiguous. Absent intervention, the analysis says higher. The risk is not directional uncertainty, it is the exogenous intervention wildcard.
The highest-risk instrument of the four today. Trade smaller. Respect the intervention threshold. Keep stops below 159.30 for any long position.
Scenarios for Friday and Next Week
| Scenario | Trigger | Target | Probability |
|---|---|---|---|
| Continuation higher | No intervention, dollar holds. Pair pushes to 162.00 to 162.50. | 162.50 to 163.00 | 40% |
| Verbal intervention pause | MOF verbal warning. Pair retreats to 160.50 to 161.00, then resumes. | 160.50 then 162+ in days | 35% |
| Physical intervention | MOF buys yen directly. Pair drops 200 to 400 pips rapidly. | 158.00 to 159.00 spike low | 25% |
Position Sizing
USD/JPY at these levels demands careful position sizing, not because the direction is uncertain but because the tail risk is large. A 200-pip intervention move against a long position is a significant loss event even on standard sizing. The approach should be to size as though the stop is at 159.30 (a 246-pip stop from current levels at 161.76) and then scale further based on how close you are to the intervention zone.
If buying a pullback to 160.00 to 160.50, the stop is 70 to 100 pips away (159.30 stop). That is a more conventional sizing exercise. On a ten thousand dollar account with one percent risk, that allows roughly 0.10 to 0.14 lots depending on exact entry. Do not increase position size as the pair rises into the intervention zone. The higher you are, the smaller you should be.
For the intervention fade trade from 162.50 to 163.00, the stop is 100 pips wide in a very volatile zone. Half sizing or less is appropriate. This is a specialist trade, not a standard continuation entry.
The Intervention Question
The single most important question for anyone trading USD/JPY this week is: at what level does the MOF act? The honest answer is they have not given a specific number. They have said they monitor excessive volatility rather than specific levels. But historical context gives a guide: they intervened twice in 2022 when the pair was at 145 and again at 151. They intervened in 2024 when the pair was at 160. Thursday’s close at 161.76 is not far from the last intervention point.
The case for restraint from the MOF this time is that the yen weakness is driven by fundamental rate differentials rather than speculative excess alone. That is a harder argument to make for intervention, which works better when there is a clear speculative positioning overhang. The case for intervention is that the pace of weakening has been rapid and the political optics of a yen at 162+ are uncomfortable for the Kishida government.
The framework says the trend is up. The intervention risk says respect the ceiling. Both statements are true. Trading that contradiction requires smaller size, tighter risk management, and a willingness to step aside when the ceiling zone approaches rather than doubling down.
This is analysis, not financial advice. Always manage your risk.
Thursday 18 Jun 2026
Titan Macro Desk · Daily Framework Read
USD/JPY — Daily Framework Read
Thursday 18 June 2026 · Closing Data
Framework Read
USD/JPY at 160.59 is not a level the market can ignore. This is the third time in the current cycle that the pair has pushed into the 160+ zone — and on both previous occasions, the Bank of Japan or the Ministry of Finance stepped in to defend the yen. The market knows this, which creates a specific dynamic: bulls in USD/JPY are playing a game of testing the BOJ’s willingness to intervene versus the carry trade economics of holding dollar-yen.
The carry trade logic: the interest rate differential between the US and Japan is enormous. US short-term rates sit at multi-decade highs; Japanese short-term rates remain near zero despite the BOJ’s modest adjustments. Borrowing cheaply in yen and investing in dollar-denominated assets has been one of the most popular institutional trades globally. As long as USD/JPY continues to rise, that trade profits from both the interest rate differential and the currency move. The moment intervention reverses the yen, the unwind of that carry trade can be violent — because the positions are large and leveraged.
What does BOJ intervention look like? The Ministry of Finance orders the BOJ to buy yen (sell dollars) in the open market. In previous episodes, the MOF spent hundreds of billions of yen in single sessions to drive the pair lower. The yen can move 3–4% in minutes during an intervention event. For anyone holding USD/JPY at 160 without a stop, that is a severe adverse move. The market’s willingness to keep pushing above 160 reflects either confidence that intervention is not imminent, or positions sized to accommodate the intervention risk.
The Nikkei’s +1.65% gain on Thursday reflects the flip side of the weak yen — Japanese export earnings are being translated back into more yen, boosting corporate profits. This is the constructive outcome for Japan’s domestic equity investors. But the structural tension remains: a yen that is too weak creates imported inflation, reducing Japanese households’ real purchasing power, and ultimately creates political pressure for the BOJ to do something about it.
Wednesday vs Thursday
Key Levels
| Level | USD/JPY | Significance |
|---|---|---|
| Intervention Trigger | 160.00+ | Historical intervention zone — MOF watching |
| Extension Risk | 162.00 | Further carry trade extension if BOJ holds back |
| Current Level | 160.59 | Active intervention risk zone |
| Post-Intervention Target 1 | 157.00 | Typical intervention move size |
| Post-Intervention Target 2 | 154.00 | Larger intervention — prior range bottom |
Bias & What to Watch
Bias: Asymmetric Risk — Dollar Bullish, Intervention Risk Caps Upside
The dollar’s strength post-FOMC supports further USD/JPY extension. However, 160+ is historically the line that brings the MOF into the market. Any position above 160 carries intervention tail risk that is binary and fast-moving.
The playbook at 160.59 is clear: the carry trade is running, the dollar is supported by the Fed, and the Nikkei is benefiting. But holding USD/JPY at these levels requires confidence that the BOJ will not move. That confidence is never warranted — intervention does not announce itself.
Watch for BOJ/MOF verbal commentary. Any Japanese official describing the yen moves as “rapid” or “speculative” is the traditional first warning sign before intervention. The Japanese press — specifically Nikkei and Jiji — often carries advance signals from Ministry of Finance briefings. Any such language should be treated as a serious flag that intervention is being discussed at the highest level.
This framework read is produced by the Titan Macro Desk for informational and educational purposes only. It does not constitute financial advice, a personal recommendation, or an inducement to trade. Markets can move against any bias. Past performance and analytical frameworks are not guarantees of future results. Always apply your own risk management. Capital is at risk.
Wednesday 17 Jun 2026
Titan Macro Desk · Post-Close · Wednesday 17 June 2026
USD/JPY — FOMC Day Framework Read
The widest policy divergence trade in global FX. Yen under renewed pressure.
Context: USD/JPY is the purest expression of the global monetary policy divergence trade. The Fed stays hawkish. The BOJ stays ultra-loose. The result is consistent yen weakness — which is exactly what we are seeing on an FOMC day where the dollar strengthens broadly. The caveat: Japanese Ministry of Finance intervention risk rises as yen weakness extends.
Our Framework Read
Bias
Bullish USD/JPY
Structural
Higher
Tail Risk
MOF Intervention
The fundamental case for USD/JPY continuing higher is straightforward. The Fed just confirmed it is staying restrictive. The BOJ, under Ueda, has been cautious about normalisation. That rate differential — one of the largest in developed markets — keeps the carry trade attractive and yen selling persistent.
But there is a ceiling that the chart alone cannot tell you about, and that is the Japanese Ministry of Finance. When yen weakness becomes politically problematic — inflationary through import costs, embarrassing for the government — the MOF has historically intervened aggressively and without warning. The 155–160 zone has historically been where the MOF drew its line. If USD/JPY pushes toward those levels, the intervention risk rises sharply.
In the near term, the direction is clear. Hawkish Fed, dovish BOJ, higher USD/JPY. But the risk-reward of chasing this trade at current elevated levels needs to account for the intervention tail risk. The asymmetry becomes less attractive the further the pair extends from recent ranges.
Our read: the path of least resistance is higher for USD/JPY. But the risk is not one-sided, and intervention can create 3–5 big figure reversals intraday with no warning. Position sizing matters enormously on this pair right now.
Key Levels
| Level | Price | Context |
|---|---|---|
| Support S1 | 148.00 | Near-term floor, buyers visible on dips |
| Support S2 | 145.50 | Structural base, significant demand zone |
| Resistance R1 | 152.00 | Prior range highs, MOF watching zone |
| Resistance R2 | 155.00 | Intervention risk escalates significantly here |
Risk Assessment
Around 45% risk
Moderate. The directional bias is clear — higher — but the intervention tail risk makes this a trade that requires disciplined position sizing. Do not over-lever on the yen trade regardless of how clear the fundamental case looks. MOF intervention is non-linear and brutal.
This post is produced by the Titan Macro Desk for informational and educational purposes only. Nothing here constitutes financial advice. Capital is at risk.
Wednesday 17 Jun 2026
Titan Macro Desk · Post-Close · 16 June 2026
USD/JPY — Daily Framework Read
Tuesday 16 June 2026 | FOMC Eve
ALERT: BOJ Intervention Zone
Current Rate
160.19
BOJ Risk
CRITICAL
Framework
WATCHING
Framework Read
Bias
EXTREME CAUTION
Framework State
WATCHING
Intervention Risk
VERY HIGH
Event Risk
FOMC + BOJ
Our Read
USDJPY at 160.19 is the most dangerous pair in the market right now. Not because of the directional trend — that has been clear for months, dollar up, yen down — but because of the tail risk it carries. At 160, you are in BoJ intervention territory. They have done it before. They will do it again.
In the summer of 2024, the BoJ intervened twice in a three-week window at similar levels, causing USDJPY to fall 5-8 big figures in hours. Anyone holding dollar-long yen-short positions at 160+ without tight risk management was wiped out. That memory is fresh in institutional circles.
The FOMC adds another dimension. A hawkish outcome would push USDJPY higher — potentially toward 162-163. That would almost certainly trigger BoJ verbal intervention first, then coordinated action with the Fed if the move accelerates. The BoJ/MoF has the reserves to defend. The question is whether they choose to.
A dovish FOMC is the only clean scenario for USDJPY bears — dollar weakens, pair falls from 160 toward 158-156 without requiring BoJ action. That would be a relief valve for Japanese policymakers.
Our read: this pair is a ticking clock. WATCHING status with maximum awareness of BoJ tail risk. Position sizing should reflect the intervention danger at these levels.
Key Levels
| Level | Rate | Significance |
|---|---|---|
| Resistance / BOJ Zone | 162–163 | Intervention likely above here |
| Danger Zone | 160.50+ | Verbal intervention escalation zone |
| Current | 160.19 | Critical level — BOJ watching |
| Support | 158.00 | Dovish FOMC support target |
| Support | 155.00 | Intervention overshoot level |
Risk Assessment
Around 80%
- 160+ is confirmed BoJ intervention territory — precedent set in 2024
- FOMC could push pair to 162+ triggering immediate response
- Tail risk: intervention can move pair 5-8 figures in hours
- July elections increase political pressure on BoJ to act
- Highest-risk pair in the FX universe right now
This framework read is produced by the Titan Macro Desk for analytical and educational purposes only. It does not constitute financial advice or a recommendation to buy or sell any instrument. All market analysis involves uncertainty. Past framework accuracy does not guarantee future performance. Conduct your own research and consult a qualified financial adviser before making investment decisions. Capital is at risk.
Tuesday 16 Jun 2026
Titan Macro Desk · Tuesday 16 June 2026
USD/JPY — Daily Framework Read
The pair has crossed 160 — a psychologically loaded level that has historically triggered BOJ intervention discussions. Carry trade dynamics remain favourable for yen weakness, but the 160 handle raises the stakes considerably.
Live Snapshot · 390-Minute Timeframe
Last Price
160.19
Session Change
+0.15%
Timeframe
390m
Bias
High Caution
Intervention Alert Zone: USD/JPY above 160.00
The BOJ and Japan’s Ministry of Finance intervened aggressively at this level in 2022 and 2024. Verbal intervention — officials expressing concern — typically precedes direct market action. Watch for statements from Japanese officials closely at these levels.
Our Read
USD/JPY has cleared 160 and is sitting at 160.19. That might look like a modest +0.15% move on the session, but the location is everything here. The 160 handle has been the line in the sand for Japanese authorities for years. Every time this pair has approached or broken it, the BOJ and Ministry of Finance have made clear — through words or actions — that they are not comfortable with the pace of yen depreciation.
The fundamental driver is straightforward. US rates remain elevated, Japan rates remain near zero, and the carry trade has been working. Borrowing yen cheaply and deploying it in higher-yielding assets is a profitable strategy in a low-volatility environment — and with VIX at 16.2, the carry trade is very much alive. That dynamic keeps pressure on the yen structurally.
But 160+ is different. At this level, the pair is not just drifting; it is entering territory where the risk-reward shifts. A hawkish FOMC Wednesday could push the pair toward 161 or 162. At that point, the probability of a BOJ intervention — or at minimum strong verbal pushback — rises significantly. When Japanese officials intervene, the moves are sharp and fast. We have seen 3-4% reversals in a matter of hours historically.
The 390-minute view shows the pair has been building higher in measured steps. There is no sign of a reversal structure yet. The trend is up. But the risk profile above 160 is asymmetric — the upside is limited by intervention risk while the downside on any policy action could be swift.
For the week ahead, FOMC Wednesday is the pivotal event. A hawkish Fed extends the dollar-yen carry. A dovish surprise reverses it sharply. The BOJ’s next meeting and any statements around FX levels are the other key variable. Monitor Japanese official language closely — first verbal warning, then potential direct action.
Key Levels
| Level | Price | Significance |
|---|---|---|
| Intervention Zone | 162.00+ | High probability BOJ/MOF direct market action. Do not chase longs into this zone. |
| Resistance / Alert | 161.00 | Round number. Verbal warnings likely become more pointed above here. |
| Current Price | 160.19 | Inside intervention risk zone. Trend up but asymmetric risk profile. |
| Psychological Level | 160.00 | Key round number breach. Now watch for pull-back bids at this level on any retracement. |
| Support | 158.50 | Near-term support if intervention or dovish Fed triggers reversal. First meaningful demand zone. |
| Major Support | 156.00 | Structural support. An intervention event could test this level in a rapid move. |
Risk Assessment
Around 75% — Elevated
Risk is elevated primarily because of the intervention zone location. The trend is technically intact but the tail risk of a sudden sharp reversal on official action is not something quantitative frameworks capture well. Position sizing matters here.
Key Risks
- BOJ/MOF verbal intervention
- Surprise BOJ rate hike signal
- Dovish FOMC reversal
- Carry trade unwind (vol spike)
Supporting Bull Case
- Carry trade fundamentally intact
- US-Japan rate differential wide
- Hawkish FOMC Wednesday
- VIX low — carry friendly
Cross-Reference
US 10-Year Yield
The rate differential is the engine. Higher US yields maintain yen pressure. Watch yields post-FOMC for direction.
VIX
VIX at 16.2 supports carry trades. A VIX spike to 20+ would unwind carry rapidly and push USD/JPY sharply lower.
Dollar strength amplifies yen weakness. FOMC-driven DXY moves will be the primary post-Wednesday catalyst.
Gold / Safe Havens
Gold and JPY often move together as safe havens. Divergence between them (JPY weak, gold firm) can signal stress building in the yen narrative.
Scenarios to Watch
Bearish JPY Scenario — Hawkish Fed / Carry Extends
Fed holds rates and signals patience. Rate differential stays wide. USD/JPY drifts toward 161. Risk is BOJ verbal warnings becoming louder above 161 — that introduces sharp reversal risk even in this bullish yen-weakness scenario.
Bullish JPY Scenario — Intervention or Dovish Fed
Either BOJ/MOF action or a dovish Fed triggers a sharp yen recovery. USD/JPY could fall rapidly to 158.50 and 156 on a serious intervention event. History suggests these moves happen fast and without warning. The key watch is official communications out of Tokyo.
This post is produced by the Titan Macro Desk for informational and educational purposes only. It does not constitute financial advice. Framework reads represent our analytical view at the time of writing and may change without notice. All trading carries risk. Past performance is not indicative of future results. Please ensure you understand the risks involved before making any trading decisions.
Titan Macro Desk · Alpha Insights · 16 June 2026
Friday 12 Jun 2026
Daily Ticker Read | Friday 12 June 2026
Dollar-Yen (USD/JPY) : Strong Trend, But -105K Short Contracts Means Squeeze Risk Is Live
USD/JPY | Spot FX | Friday 12 June 2026
USD/JPY is the strongest trending pair in the FX universe right now, and the chart makes that obvious at first glance. The uptrend is steep, persistent, and backed by everything from rate differentials to risk appetite. But there is a number that should make anyone running this trade sit up and pay attention: -105,000 net short yen contracts. That is an extreme in speculative positioning. Trends this crowded do not end gently. They either continue with increasing violence or they snap back with the same force. Friday heading into a weekend is where that tension matters most.
The Read
| Direction | BULLISH |
| Conviction | High |
| Risk Assessment | Around 50% — trend is powerful but positioning extreme creates tail risk |
| Estimated Price | ~154.50 |
| Bias | Bullish — all layers agree, but respect the squeeze risk |
Yesterday vs Today
Thursday 11 June
Uptrend was firmly intact. The framework was reading the rising trend as strong with full layer confirmation. Value area highs were being tagged and respected as launch points rather than rejection zones. The pattern was bullish building — each pullback was finding buyers and pushing to new highs. Yen shorts were deepening, but the trend showed no signs of exhaustion.
Friday 12 June
All layers agree. Full conviction trade. The analysis reads this as bullish with everything aligned. The uptrend is intact, momentum continues to push higher, and the trend line is rising steeply. Value area expansion continues to the upside. The stop area is identified well below current price, giving room for the position to breathe. The only flag is the positioning extreme at -105K contracts, which the framework acknowledges as a risk but not a reversal signal.
What We See
Structure: The chart is a textbook uptrend. The trajectory is steep and consistent, with value area highs expanding into new territory on each session. Titan Lane breakdowns are absent on the upside — the trend markers are all green and confirmed. The structure is not just bullish, it is the cleanest trending structure across all FX pairs. Prior resistance zones have been absorbed and turned into support platforms for the next push higher.
Momentum: Strong and building. The analysis reads momentum as fully aligned with the trend direction. There is no divergence, no fading, no signs of exhaustion in the momentum read. The rate differential between the Fed and BoJ continues to drive flow, and the Iran de-escalation has added a risk-on tailwind that further supports dollar-yen upside. When risk is on and rates favour the dollar, USD/JPY accelerates.
The Positioning Problem: Yen shorts at -105,000 net contracts are at extreme levels. This is the elephant in the room. The trend is right, the structure is right, the momentum is right — but the positioning is crowded. When everyone is on the same side of the trade, the exit gets narrow. A sudden shift in risk sentiment, a BoJ intervention signal, or a weekend headline could trigger a rapid unwind. The framework does not predict that, but it acknowledges the risk. Size accordingly.
The Call: Bullish with high conviction on direction, but moderate conviction on timing. The trend is powerful and the framework is unanimous. However, entering a heavily crowded trade on a Friday afternoon before a weekend with live geopolitical risk requires discipline. If you are already long, trail your stop. If you are looking to enter, Monday’s Asian session may give you a better risk-reward entry than Friday’s close.
Key Levels
| Level | Price | Significance |
|---|---|---|
| Resistance 2 | 156.00 | Psychological round number — BoJ intervention watch zone |
| Resistance 1 | 155.20 | Recent swing high — immediate upside target |
| Current | ~154.50 | Within steep uptrend channel |
| Support 1 | 153.50 | Value area low — pullback buy zone |
| Support 2 | 152.00 | Trend line support — squeeze trigger if broken |
Risk Assessment
Around 50% — This is an unusual situation where the directional conviction is high but the risk is also elevated because of the positioning extreme. The -105K net short yen contracts mean the exit door is narrow if sentiment shifts. The trend is intact and the framework is unanimous, but sizing and stop discipline matter more than usual. A BoJ intervention warning, a risk-off weekend headline, or a sudden shift in rate expectations could trigger a violent unwind. Respect the trend, but do not ignore the crowding.
Related Alpha Insights
Today’s Positioning brief covers the yen short positioning extreme in detail. The Macro brief addresses the Fed-BoJ rate divergence that underpins this trade. See the Dollar Index read for the DXY context and the Pre-Asia brief for how this trade sets up into Monday’s Tokyo session.
This content is for informational and educational purposes only. It does not constitute financial advice, a recommendation, or an invitation to trade. All trading involves risk, including the potential loss of principal. Past performance does not guarantee future results. Always conduct your own research and consult a licensed financial adviser before making investment decisions. Alpha Insights is a research publication, not a regulated advisory service.
Friday 12 Jun 2026
Daily Ticker Read | Friday 12 June 2026
Dollar-Yen (USD/JPY) : Strong Trend, But -105K Short Contracts Means Squeeze Risk Is Live
USD/JPY | Spot FX | Friday 12 June 2026
USD/JPY is the strongest trending pair in the FX universe right now, and the chart makes that obvious at first glance. The uptrend is steep, persistent, and backed by everything from rate differentials to risk appetite. But there is a number that should make anyone running this trade sit up and pay attention: -105,000 net short yen contracts. That is an extreme in speculative positioning. Trends this crowded do not end gently. They either continue with increasing violence or they snap back with the same force. Friday heading into a weekend is where that tension matters most.
The Read
| Direction | BULLISH |
| Conviction | High |
| Risk Assessment | Around 50% — trend is powerful but positioning extreme creates tail risk |
| Estimated Price | ~154.50 |
| Bias | Bullish — all layers agree, but respect the squeeze risk |
Yesterday vs Today
Thursday 11 June
Uptrend was firmly intact. The framework was reading the rising trend as strong with full layer confirmation. Value area highs were being tagged and respected as launch points rather than rejection zones. The pattern was bullish building — each pullback was finding buyers and pushing to new highs. Yen shorts were deepening, but the trend showed no signs of exhaustion.
Friday 12 June
All layers agree. Full conviction trade. The analysis reads this as bullish with everything aligned. The uptrend is intact, momentum continues to push higher, and the trend line is rising steeply. Value area expansion continues to the upside. The stop area is identified well below current price, giving room for the position to breathe. The only flag is the positioning extreme at -105K contracts, which the framework acknowledges as a risk but not a reversal signal.
What We See
Structure: The chart is a textbook uptrend. The trajectory is steep and consistent, with value area highs expanding into new territory on each session. Titan Lane breakdowns are absent on the upside — the trend markers are all green and confirmed. The structure is not just bullish, it is the cleanest trending structure across all FX pairs. Prior resistance zones have been absorbed and turned into support platforms for the next push higher.
Momentum: Strong and building. The analysis reads momentum as fully aligned with the trend direction. There is no divergence, no fading, no signs of exhaustion in the momentum read. The rate differential between the Fed and BoJ continues to drive flow, and the Iran de-escalation has added a risk-on tailwind that further supports dollar-yen upside. When risk is on and rates favour the dollar, USD/JPY accelerates.
The Positioning Problem: Yen shorts at -105,000 net contracts are at extreme levels. This is the elephant in the room. The trend is right, the structure is right, the momentum is right — but the positioning is crowded. When everyone is on the same side of the trade, the exit gets narrow. A sudden shift in risk sentiment, a BoJ intervention signal, or a weekend headline could trigger a rapid unwind. The framework does not predict that, but it acknowledges the risk. Size accordingly.
The Call: Bullish with high conviction on direction, but moderate conviction on timing. The trend is powerful and the framework is unanimous. However, entering a heavily crowded trade on a Friday afternoon before a weekend with live geopolitical risk requires discipline. If you are already long, trail your stop. If you are looking to enter, Monday’s Asian session may give you a better risk-reward entry than Friday’s close.
Key Levels
| Level | Price | Significance |
|---|---|---|
| Resistance 2 | 156.00 | Psychological round number — BoJ intervention watch zone |
| Resistance 1 | 155.20 | Recent swing high — immediate upside target |
| Current | ~154.50 | Within steep uptrend channel |
| Support 1 | 153.50 | Value area low — pullback buy zone |
| Support 2 | 152.00 | Trend line support — squeeze trigger if broken |
Risk Assessment
Around 50% — This is an unusual situation where the directional conviction is high but the risk is also elevated because of the positioning extreme. The -105K net short yen contracts mean the exit door is narrow if sentiment shifts. The trend is intact and the framework is unanimous, but sizing and stop discipline matter more than usual. A BoJ intervention warning, a risk-off weekend headline, or a sudden shift in rate expectations could trigger a violent unwind. Respect the trend, but do not ignore the crowding.
Related Alpha Insights
Today’s Positioning brief covers the yen short positioning extreme in detail. The Macro brief addresses the Fed-BoJ rate divergence that underpins this trade. See the Dollar Index read for the DXY context and the Pre-Asia brief for how this trade sets up into Monday’s Tokyo session.
This content is for informational and educational purposes only. It does not constitute financial advice, a recommendation, or an invitation to trade. All trading involves risk, including the potential loss of principal. Past performance does not guarantee future results. Always conduct your own research and consult a licensed financial adviser before making investment decisions. Alpha Insights is a research publication, not a regulated advisory service.
Friday 5 Jun 2026
USD/JPY — Daily Read | Friday 5 June 2026
Titan Protect Alpha Insights | Rates Repricing Day | analysis as of pre-market 5 June 2026
Market Context
USD/JPY surged on Friday as the hot Non-Farm Payrolls print widened the US-Japan interest rate differential significantly. The pair is among the most direct expressions of the Fed versus BOJ policy divergence, and Friday’s data reinforced that divergence dramatically. The Bank of Japan’s gradual normalisation path remains slow relative to where US rates are anchoring, and any prospect of Fed cuts in the near term has been pushed materially further into the future.
Yen weakness has a dual effect on Japan’s economy: it inflates import costs, particularly for energy and food, adding to domestic inflationary pressures that the BOJ is already managing carefully. However, it provides a significant earnings boost to Japan’s export-heavy corporate sector. The net effect on the Nikkei is complex, but for USD/JPY itself, the direction is clear: higher as long as the Fed stays hawkish.
The risk of BOJ verbal intervention or outright currency market intervention is a constant tail risk at elevated USD/JPY levels. Japanese officials have historically intervened when the pace of yen weakness becomes disorderly, and a sharp single-day move following NFP may attract attention from Ministry of Finance officials.
Rate differential strongly favours dollar. The trend is higher but intervention risk grows the closer the pair pushes to multi-decade highs. Manage positions around 160 with caution.
Key Levels
| Level | Price | Significance |
|---|---|---|
| Resistance / Target 2 | 160.00 | Psychological level — prior intervention zone |
| Resistance / Target 1 | 158.50 | Near-term resistance and prior swing high |
| Close / Pivot | 157.40 | Friday close |
| Support 1 | 156.00 | Pre-NFP base and immediate support |
| Support 2 | 154.20 | Key demand — loss signals intervention or policy shift |
Weekend Setup
USD/JPY holds the momentum heading into the weekend with the rate differential story firmly intact. The key question is whether Japanese officials will signal discomfort with the pace of yen depreciation. Any weekend statement from the Ministry of Finance or BOJ Governor warning against excessive volatility should be treated as an imminent intervention warning.
Absent intervention signals, the pair has a clear path towards 158.50 next week. The 160.00 level is a significant psychological threshold that has historically attracted intervention. Position sizing should reflect the binary risk at that level.
Risk Note: BOJ/MOF intervention is the primary tail risk. Past interventions have produced 3-5% reversals in a matter of minutes, wiping out significant open profits on long USD/JPY positions. Never trade this pair without defined risk management at levels approaching 160.
This content is for informational and educational purposes only. It does not constitute financial advice, a personal recommendation, or a solicitation to buy or sell any financial instrument. Past performance is not a reliable indicator of future results. Trading involves significant risk of loss. Always conduct your own research and consult a qualified financial adviser before making investment decisions. Titan Protect Alpha Insights is not authorised or regulated by the Financial Conduct Authority.
Friday 5 Jun 2026
USD/JPY — Daily Read | Thursday 4 June 2026
Published: Thursday 4 June 2026 | Titan Protect Alpha Insights
USD/JPY has pulled back below 160, which represents a relief for the Bank of Japan and removes some of the extreme yen weakness that had been drawing intervention speculation. The pair’s move lower is consistent with the broader DXY weakness story playing out across G10 FX. For Japan’s export sector, however, every step lower in USD/JPY compresses the earnings translation benefit they have been enjoying.
What the Analysis Shows
The 160 level in USD/JPY is a politically and technically significant marker. Above 160, the BoJ faces market speculation about intervention and political pressure regarding the cost of living impact of a weak yen. Below 160, that pressure reduces markedly. The return below 160 is therefore notable as a signal that the acute yen stress has eased for now.
The driver of the move lower is dollar weakness rather than yen strength in isolation. DXY below 100 is pulling the dollar down against most major currencies, and the yen is no exception. The BoJ’s gradual normalisation path (they have hiked once from the zero lower bound) is also providing mild structural support for yen.
Bias: Bearish USD/JPY (yen strengthening). Dollar weakness is the dominant force. NFP tomorrow could reverse this sharply if it is a strong beat, as US yields would rise and the rate differential that underpins the yen carry trade would widen again. Treat the current level as transitional, not settled.
Key Levels
| Level | Price | Significance |
|---|---|---|
| Support (USD/JPY) | 156.00 | Stronger yen target, medium-term |
| Support (USD/JPY) | 154.00 | Key demand for dollar bulls |
| Resistance | 160.00 | Intervention watch level, now overhead |
| Resistance | 162.00 | Prior cycle high area |
Tomorrow’s Setup
NFP is binary for this pair. A strong US jobs print pushes USD/JPY back above 160 rapidly as US yields reprice higher. A soft print extends yen strength and could target 158 or lower. The carry trade narrative is directly tied to US rate expectations, making NFP an outsized event for this pair.
Risk Note: USD/JPY carry trade unwinds can be violent and fast. If the pair breaks meaningfully below 158, algorithmic selling can accelerate the move in a way that creates opportunities but also substantial risk for under-sized positions. NFP is the immediate trigger to watch.
This analysis is for informational purposes only and does not constitute financial advice. Markets involve risk. Past performance is not indicative of future results. Always conduct your own due diligence before making any investment decisions.
Thursday 4 Jun 2026
US Dollar / Japanese Yen (USD/JPY)
Daily Read — Wednesday 3 June 2026
Current Price
160.05
Daily Change
+0.26%
What Happened Today
USD/JPY pushed back above the psychologically significant 160.00 level, rising 0.26% as dollar demand picked up following the ISM data. The yen had been showing signs of tentative strength in recent sessions, but today’s move reverses some of that and puts the Bank of Japan’s implicit intervention threshold back in focus.
At 160, the market is in territory that has historically prompted Japanese Ministry of Finance attention. The BoJ intervened in 2024 at similar levels, and traders are acutely aware that intervention risk increases the longer the pair holds above this level. This creates asymmetric risk — the move higher is technically possible but carries intervention tail risk.
The fundamental driver remains the interest rate differential: US rates are materially higher than Japanese rates, and until that changes meaningfully, the yen remains structurally weak. A strong NFP on Friday would push rates expectations higher and likely extend the USD/JPY move.
Key Levels
| Level | Price | Significance |
|---|---|---|
| Resistance | 162.00 | Intervention zone threshold |
| Pivot | 160.00 | Current level / intervention watch zone |
| Support 1 | 158.50 | Recent base |
| Support 2 | 156.00 | Monthly swing low |
Current Bias
Rate differentials favour dollar strength, but the pair is in intervention territory. Upside is real but tail risk is asymmetric above 160.
What to Watch Tomorrow
- Any Bank of Japan statement or commentary on the yen
- Sustained hold above 160 increases intervention probability
- US Treasury yield direction — the primary fundamental driver
- Friday NFP: strong number = further yen weakness
Risk Assessment
High. Around 70% risk environment. Intervention risk makes this one of the most asymmetric setups in the FX space right now. The spike risk on a BoJ intervention is substantial.
This content is for informational purposes only and does not constitute financial advice. Past performance is not indicative of future results. Trading involves risk of loss. Always conduct your own research before making any investment decisions.
Tuesday 2 Jun 2026
GBP/USD — Daily Framework Read | Tuesday 2 June 2026
GBP/USD | Post Close Setup Daily Read | Data basis: 2026-06-02 close
Where It Sits
Structure
Structurally GBP/USD sits above its short-term moving averages with the daily trend firmly higher. The recent advance has been orderly with no signs of distribution or topping behaviour. The reference anchor at 1.3468 acts as the bias line.
Momentum
Momentum is neutral with internal readings near the centre of the range. That is the signature of a market digesting the prior move. The tape needs a fresh catalyst to commit to direction.
Volume & Flow
Volume data is limited for this session. The positioning read is neutral — no obvious skew in either direction. Watch for flow confirmation on the next session.
Key Levels
| Level | Type | Significance | Action Zone |
|---|---|---|---|
| 1.3513 | Resistance | Upper range target, prior supply zone | Take profits / fade if rejected |
| 1.3483 | Pivot | Mid-range continuation marker | Hold = constructive; lose = consolidation |
| 1.3468 | Session close | Reference anchor for next session | Above = continuation; below = mean revert |
| 1.3444 | Support | Recent range floor, demand zone | Buy zone with defined stop |
| 1.3414 | Major support | Prior breakout retest level | Stop-out below for longs |
Three Scenarios
Continuation
GBP/USD holds the session close at 1.3468 and pushes higher on continued positioning flow. The broader trend remains intact. Watch the dollar tape for confirmation.
Range
GBP/USD opens flat and ranges around 1.3468. Neither side has conviction without a fresh data catalyst. Range trade dominates.
Mean Reversion
GBP/USD breaks below support on a shift in dollar positioning. Mean reversion within the broader trend. Watch for a clean test of support before committing.
Risk Score
Risk sits at Around 45%
Risk sits around 45 per cent. Vix at 15.7 supports a measured risk posture. sentiment at 57 is neutral. Currency pairs carry intervention and data-release headline risk. Standard sizing with defined stops — discipline beats conviction.
How to Walk It
Entry / Stop / Target structure:
- Long 1.3444 pullback | Stop 1.3414 | Target 1.3483 | R:R 2:1
- Long 1.3483 breakout | Stop 1.3468 | Target 1.3513 | R:R 1.5:1
- Fade 1.3513 rejection | Stop above resistance | Target 1.3468 | R:R 2:1
Experience-level guidance:
Beginner: Reduce size to half your standard. Trade only the cleanest setup from the entries above. If the tape opens against your bias, do nothing — wait for the second hour, when the institutional flow has tipped its hand.
Intermediate: Use the levels table to define the trading range. Fade the extremes with defined stops, take profits before the round-number resistance levels.
Advanced: The vol regime supports defined-risk structures around the key pivot levels. Keep notional small relative to your book — asymmetric speculation, not core positioning.
Continue Reading
The macro frame driving this read is unpacked in the session briefs:
Check the latest session briefs on the site.
This analysis is for educational and informational purposes only. It does not constitute financial advice. Always manage your risk independently and in accordance with your own financial circumstances.